Wednesday, April 21, 2010

Stalingrad: Building Ruins (an oxymoron)

Oxymorons, boy, do I love ‘em.  Mirriam-Webster dictionary defines it as a combination of contradictory or incongruous words (as cruel kindness); broadly something (as a concept) that is made up of contradictory or incongruous elements.

Our everyday language is rife with them.  You've heard them.  Here’s some of my favorites: military intelligence, civil war, anti-missile missile, a just war, civilized warfare and deafening silence amongst others.

So when I started (here it comes…) ahem, building ruins for my 28mm Stalingrad table when that thought struck me.  But I digress… I challenged myself in making these ruins from what I had available in my house.  I’ve been sorely tempted into buying some premade ruins.  But the scrounger in me was dying for a more creative and cost effective solution.

Rooting around my garage I found some spare 1/2" thick 2'x4' styrofoam ceiling panels.  The rest of the materials I already had readily available: glue, straight pins, paint and assorted sizes of ballast such as fine pumice, colored sand, lizard litter and cat litter (in respective order from fine to coarse) for texturing.

(click on the pix to enlarge)

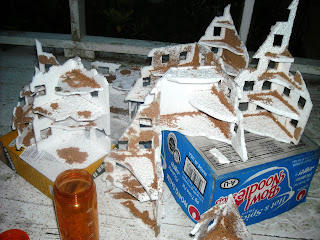
Using a CAD program I was able to print out a section of a typical building story to be to scale with 28mm.  From there I was able to cut pieces with my foam cutter of wall sections that I was modelling.  


I was fortunate that the ceiling panel came textured on both faces.  And being 1/2" thick, I knew that I had to thin it out to a 1/4" thick be to scale with my figs.  You could see the speckled, cottage cheese texture on the wall face as well as the diamond pattern for the floor.

Here's the finished sections of ruins glued and textured with lizard litter.  All fenestration (windows and doors) were cut with the foam cutter.


Latex paint was the first coat to protect the foam and to be followed later by different spray paints.


Here's a few rubble piles I'm working on.  I'm using different size material and textures: pieces of foam cut from wall sections, popsicle sticks and different ballast as mentioned above. 

After the latex coat has dried I sprayed with gray, olive drab and black.


On to drybrushing. 

To be continued...

Friday, April 16, 2010

Al Qaeda Fedayeen

When I first got these figs from Guy at Montag's (back in 2008) I couldn't wait to get started, hurry up and finish painting this unit. So being the crazy, fanatical and OCD-type painter that I am, I put these guys in front of line and finished them within days to get them entered into the upcoming OwlCon painted figures contest. I entered them in the Historical Unit category and voila!


This is the first painting prize I ever got. I was so proud - it brought tears to my eyes... Also notice the mis-spelling of my nickname. *sigh* But I digress... 


Now I know what you maybe thinking about these bad boys. "Yeah, they're pretty but can they fight?" And the answer to that is a resounding "Yes!" See my earlier blog entitled, "Al Qaeda Fedayeen in Action!" as this unit gets bloodied for the first time and prevails against the vaunted US Rangers in some light skirmishing.

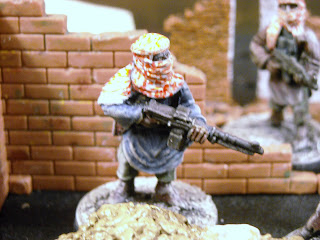
For added flavor let me introduce the team: Mo (short for Mohammed) sporting an RPD support LMG.  He's done up in the latest in urban guerilla fashion.  His head dress is typical and indicative of his tribal association.  Muted colors of blue and brown are in vogue for this season.  Fabrics are wash and wear with, of course, breathable Egyptian cotton. Footwear is the standard Iraqi Army combat boots circa late '80s.


But all seriousness aside, here's the team sharp-shooter and all around bad a$$: Ali-bubba. Born and raised in the south, doncha know?

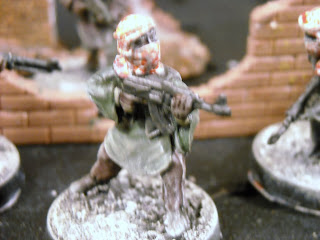
Ay Kay, the team's weapons expert is usually on point. He likes the AK47 like most of his ilk and is rarely leaves home without it.

Finally, the not so famous Al of the Saudi Bin Ladens. He's a cousin of an infamous Bin Laden. 


On maneuvers and spoiling for a fight. Practice, practice, practice...

For some recent action they were involved in see my recent blog post:


Tuesday, April 13, 2010

FoW Award Winning Objective Marker

Here's a quick post on an objective marker that I created awhile ago when I was heavily into Flames of War.  

First Edition Rulebook Cover

2nd Edition Cover

If you're not familiar with FoW, it's a very popular WW2 platoon sized table top rules set. Using primarily 15mm scale (altho you can use other scales as well) you can recreate most battles in the European and North African Theaters (the Eastern Front being my all time favorite).  Last I checked they still haven't gone into the Pacific.

At any rate, 7 basic scenario types are listed in the rulebook and other downloadable pdfs from the FoW site. All battles are resolved using any of these scenarios by fulfilling set victory conditions. Most of them involves the capture of an objective hence the need for an objective marker. At first Battlefront (makers of the miniatures that FoW markets successfully) had a few pre-made objectives that were only available thru special boxed sets. I decided to make my own. 

After a couple of tries I decided on a crashed plane. Surfing through the net resulted in all kinds of great pix for inspiration. Here's just a couple of examples of what I found.


Although they weren't dramatic enough for my taste. I knew that the final product needed to have as much bang as I can fit in a typical FoW stand. My original idea was a downed biplane to simulate a crashed Night Witch that wasn't quite successful in her mission. Do wiki this very colorful unit or check out this link: 


I discovered them in a great novel about Kursk and Operation Citadelle entitled 'The Last Citadel' by David L. Robbins. If you're a WW2 aficionado like me, I recommend his stories.
  
So I kit bashed a prepainted, plastic model of a 144th scale FW109 that was $2.99 from Walmart (forgot the brand name but it ain't Dragon). Happily, I got voted the best Objective Marker in one of the many mini tourneys we had at Little Wars of Houston a few years back. 


Downed FW190 Objective marker for FoW - front view.


Saturday, April 10, 2010

Stelkovy - WIP

Soviet Strelkovy seen here charging German held positions in Stalingrad from the movie "Enemy At The Gates".    


The much anticipated (especially by me) Strelkovy by Black Tree Design in 28mm were a long time coming. They are to be used for an upcoming Nuts! game. These guys will fight my Fallschirmjagers. I'm still waiting for the rest of my order to arrive from the UK but in the meanwhile, I've been busy completing what I have so far.

After hand painting with black primer, I drybrush with an off white color like sand. 


Then the base color goes down.


Base color done and ready for dipping.


After the dip has dried (24 hours) a couple of coats of Testors Dull Kote need to be applied to cut down the glossiness. Then another round of drybrushing is done to highlight the details. Next they're mounted on 3/8" flat washers for a great weighted and cost effective base. I use White Pumice #26.212 to texture the base. Incidentally, the pumice would make a good winter snow base for the next unit I'm planning: Soviets in winter camo. 


I think I'll leave the sniper base-less and without any allegations.


OK - just a few more steps and this unit will be ready to fight.

Thursday, April 8, 2010

Al Qaeda Fedayeen in Action!

A couple of years ago, I took a break from Flames of War (FoW) and dabbled in a modern skirmish game called Dogs of War (DoW) for small unit actions made up of 4 men per side.  I enjoy gaming this era b/c of all the cool weapons, situations, etc. Heck, I just love gaming, period! However, I found DoW to be a bit complex and somewhat slow w/ all the charts, record keeping, details and micro-management.  I wasn't going to learn this system b/c of what I just mentioned and I was still in the search for an easier and relatively smoother skirmish rules set.  Fortunately, Patrick, who owns the game, really knew how to run it. I've since had a couple of scenarios that I truly enjoyed playing. 

Prior to this battle, much hype and buzz was generated at the store for the type of miniatures available to paint.  DoW also features a fine catalog of units to choose from. So I ended up choosing units that are colorful, infamous and cool to paint hence Al Qaeda Fedayeen and Soviet Paras (now if you know me, you'll realize that I have this fascination with things Russian. It seems like I have a Russian unit for whatever era it is that I'm interested in.) At any rate, I'll be blogging about each unit separately in the upcoming days. 

I immediately got down to painting the Al Qaeda and here's some shots of them in action against US Rangers in an unnamed Middle Eastern town. The game was played at Montags'. Guy (the owner) really did a great job scratch building the roads and buildings for this table. 

On to the action...

Our skirmish started w/ a fierce fire fight because of the Rangers' (run by Hunter) infiltration with the vaunted Blackhawk (behind the building and in the background) was discovered by the diligent Fedayeen. We used a civilian style H2 Hummer model to simulate a Humvee.

The fire fight continued across the roof tops.  My ambush worked as can be seen with the green gems denoting hits on a figure.


Unfortunately for the Rangers, a die roll resulted in the recall of the Blackhawk, losing their air support and exposing them to additional dangers. "Haha... Unbeknownst to the infidels, our tank support is coming up on the Humvee." 

"Here comes my cousin, Abdul and our tank support." - Watch out Humvee!

Too late! Toast!

Well that was fun. Nowadays, I'm happy to report that I did find a quick and easy rules set for skirmishing from Two Hour Wargames (THW) called Nuts! It's actually a WW2 skirmish rules set but the system is so flexible that I've been using it for modern w/ my Al Qaeda and Soviet Paras.  Here's a link to a batrep of a recent fight that both units were in:


Read all about it. Thanx Veloci (LTLDad) for the excellent batrep.

Sunday, April 4, 2010

Jumpin' on the Zombie bandwagon!!

Well, I had to do it.  Part of my game collection includes a board game called, "Last Night on Earth" which I've acquired a couple of years ago when released and have only played twice (both in the game store where I purchased it).  The graphics and art work were well done.  But I couldn't get past the look of the minis.  They needed some color to add some visual umpf! and appeal to the board.  

Suffice it to say, I vowed one day that I would paint them giving them more character and life than their current monochrome tones.  The zombies come in two colors of orangish brown and a light olive drab.  Our heroes are a dull grey.


If it wasn't for an ATZ game that Veloci was running, I wouldn't have painted these figs as soon as I did and they would've been languishing in their box for some time to come.


Here're the zombies (the game only came with 14 miniatures total with 3 different poses although the game mechanics respawns them and only allows a set number to be on the board at any given time unlike ATZ where the more the merrier and you never seem to have enough):


Here's the survivors starting with the ladies from left to right: Jenny, the Farmer's Daughter; Sally, the High School Sweetheart and Nurse Becky.

The guys from left to right: Billy, the Sheriff's son; Jake the Drifter (a personal favorite); Sheriff Anderson, Johnny, the Jock and Father Joseph.

I don't remember much of how "Last Night' is played however these minis got more action on some recent ATZ games!


LinkWithin

Related Posts Plugin for WordPress, Blogger...