Showing posts with label Gladiators. Show all posts

Thursday, May 21, 2015

A Digital Departure: 7 Days To Die

Side tracked once again...

PC gaming reviews on my historical miniatures blog is a definite departure from my usual. And this post highlights my current PC gaming interest. Not to worry since I’m still an avid miniaturist and am taking a break from multiple projects on my work bench crying out to me in their tiny little, miniature voices. But as stipulated in my blog profile, "Like most gamers I’m ADD and my areas of interest cover a wide range of periods and scales [and game types]. I do everything from Ancients to Zombies and everything and anything in between that catches my eye." And with that little disclaimer aside…

My first ever foray into early access gaming: 7 Days To Die. It is still in Alpha and just released 11.4 via Steam. We're now all waiting for the soon-to-be released Alpha 12 with bated breath.

The best way to survive and kill more Zombies in this game is to construct a secure base for raiding and scavenging. In this latest multiplayer, cooperative game, my buddy, George, and I have finally come up with an effective design for the construction of our latest, secured base. Being an architect, this game fulfills the builder in me because the crafting feature is very intuitive. For some of you who don't know what this game is about wikipedia describes it as “"7 Days to Die is an open world, voxel-based sandbox game created by The Fun Pimps. It is a mash up of first-person shooter, survival horror, and role-playing games combining combat, crafting, looting, mining, exploration, and character growth." 


'The Fortress' as seen from the north side. Note the additional 'firing platforms' attached to the building exterior, the entry bridge on the left and the 2nd floor connector bridge to the house on the right. 

Featured in this post is our secondary base named aptly ‘The Fortress’. Our first base called ‘Alpha’ (not pictured) was very successful and is very similar to this structure. We used Alpha as our model to complete The Fortress.

From here, our goal is to eventually raid the ‘Hub City’ (so called because of it's central location on the map - coordinates 0,0) for valuable loot. That’s easier said than done since the hub city has been fully upgraded with newer and meaner zombie bad-asses (burning zombie and feral zombie) along with the plethora of the rank and file, dogs, hornets and barf cops. Visibility has also been cut down markedly by foggy and smoky conditions.


The dreaded 'Feral Zombie' which takes multiple head shots to put down depending on one's level.
Barf or vomit cops!

Zombie dogs attended by rank and file zombies.

Rank and file!

Our Fortress is an existing structure modified by using lessons learned from past games. It is a residential, mixed use, 3 story masonry building with retail at ground floor and two upper floors of living quarters, hence, mixed use. We settled on the roof placing our forge, cooking fires, sleeping mattresses (this is another option to using beds or sleeping bags for re-spawning points noted on your compass as your ‘home’) and storage containers. It gives a good commanding view of the immediate vicinity. However the game produces a fog that obscures vision during the wee hours and there's nothing scarier than the sound of hornets buzzing announcing the arrival of a running zombie train. We've found that the roof offered the best security and safety.


My gaming buddy shown here in his gaming avatar as Monty XXX standing on the 3rd floor firing platform.
We've supplemented this structure with expanded firing platforms along the edges (where I've had many a mishap and fatality falling off and impaling myself on those spikes below). 

Another significant defense feature are the addition of a series of bridges connecting our fortress with surrounding houses. This extends the outer perimeter and the neighboring roofs also make excellent firing platforms.

Vertical ladders shown at the building edges at strategic located for easy access to all levels and points of our base for defense and repair.

Additional loopholes (firing positions) triangular in shape have been added for easy defense at blind spots. But nothing beats my all-time favorite: a field of metal reinforced, log spikes 5 rows deep planted all along the base of our fortress. They have proven to be quite an effective deterrent to those pesky zombies time and time again.

Game clock on the upper left shows 11:31 pm and you can see the foggy mist coming in.

So aside from the building structure (masonry or reinforced concrete being the strongest), added firing platforms and loop holes to mitigate blind spots and defilades, and log spikes, the best way of securing and isolating our fortress from Zombie breaches IMHO was to locate our building entries to the second floor. I’ve put in stairs because my clumsiness was a common occurrence (read: constant breaking of my legs!!!) on vertical ladders during my panicked rush to get inside.


Just a parting shot of a collection of my gaming group's Gladiator minis posed on another scratch built arena (not mine). This is a historical miniatures gaming blog, after all.


Friday, March 18, 2011

Joining the 'Arena Race' Part 3: DONE

Without further ado...


Finally my Governor's Box and stands are done. I decided on a trellis for some al fresco viewing with a fabric awning covering option (see below). I've also simplified the Doric columns and added spikes for that 'barbaric' look.

Review of condemned prisoners.
In lieu of Roman figures I'm proxying my Mongols for scale and for the downright fun of it!
A minor Khan of the Golden Horde. This command pack is from The Assault Group (TAG).
TAG Mongol slavers keep the Chinese PoWs in line for the upcoming games.
Sentencing by the Khan while the ominous drummer keeps the beat.
Gladiators (from BTD) are reviewed as some Arabic peasant riffraff from Old Glory look on.
"Ave, Governor! We who are about to die salute you."
And now a word from our sponsors... 

I've always wanted to create ancient and classically themed ads (ala NASCAR) to enhance my scratch-built Colosseum for running chariot races back in the 80s. So I've finally done it here. 

I had a lot of fun researching these familiar icons. 
The cheap seats.
Execution commences.
The other cheap seats.


Now all I'd need is to get some female gladiators... 
1974 blaxploitation film starring Pam Grier and Margaret Markov

Tuesday, March 15, 2011

Joining the 'Arena Race' Part 2

Construction has progressed for my 'barbaric' wooden arena set in the outer fringes and frontier outpost of the Republic / Empire. Images that inspired me from recent films like Centurion has given me great ideas for the overall look and feel.


I love all the look of the rough hewn timber. 
With these images fresh in my mind and those lessons learned from the massing model I then incorporated improvements to the finish model. Namely a taller height for the Governor's Box. It makes the addition of the portcullis gate opening more proportional thus allowing me to add more details and embellishments to this structure. 


Available foam that I had laying around in my scrap pile that forms the structural core to be clad in wood. 

Thankfully, this project has used most of my Popsicle sticks from the 80s.
For the Governor's Box, I decided to use pavers to represent an upgraded flooring material. Nothin' but the best for the Governor. BTW - material used for this was acquired from the Doll House department at my local craft store. They're sheets of embossed styrene that represent ceramic bathroom tiles.
Base color applied and ready for a much needed dry brushing and weathering. 
Side by side comparison: weather or not?
Dry bush and ink wash cycle (lather, rinse and repeat) to get the desired effect. Here's where the warping effect actually aided in the overall look and feel of weathered wood brought out by dry brushing. 
Almost done.

Sunday, March 13, 2011

Joining the 'Arena Race' Part 1

With all the great examples and inspiration from both Hetairoi (http://hetairoiwargames.blogspot.com/2011/03/gladiator-arena-finished.html) and Soldat (http://theminiaturespage.com/boards/msg.mv?id=223283) of recently completed arenas I realized that I needed to build my very own! I was fortunate enough to have played in Soldat's arena which he brought over for game day last week (http://thehistoricalminiaturist.blogspot.com/2011/03/saturday-is-game-day.html). At that point I was hooked and sorely convinced that I needed to start abuilding.


First things first, deciding on the general shape of my arena. Having played on Soldat's arena taught me a few lessons. Its rectilinear shape made more practical sense. I also wanted to model the viewing stands and Governor's Box on just the one side for ease of playing. Finally, I didn't want to build things that I didn't feel necessary especially if it could be represented by alternate means and can be easily acquired. 


For my arena floor I chose a cork bulletin board with a very fine cork texture because:  
  1. the rectilinear shape allowed for better storage and portability,
  2. it had a big enough area for my minis to battle in,
  3. the color and texture of the cork simulated sand very well
  4. and it's premade. :D
Bottom line: it satisfied my criteria from a purely functional, practical and aesthetic stand point. And you know I'm all about the eye candy.
17" x 23" Bulletin Board easily available at most craft stores like Hobby Lobby or Michael's. Forgive the lack of focus.

Relative to the recent and excellent examples mentioned above I also wanted to model my arena on the outer fringes of the Republic / Empire. Some backwater hellhole and outpost on the frontier bordering the barbarian lands. 


What that translates to, IMHO, is an arena mostly constructed of wood with minimal stone or marble since those materials would be slated (pun intended) for priority items such as walls and the Governor's villa.
Foam mock-up and massing model.
Close up of the Governor's Box.

Materials - Popsicle sticks I've had since the 80s and other assorted wood bits, fabric and other miscellaneous items I've found at my local craft store. 
Very important tool and an absolute must for scratch build projects. 
Detail studies.
Palisade and portcullis.
After the obligatory massing model was completed and studies done I proceeded to the construction of the actual stadium stands.


If you look carefully, you can see the mock up and massing model beyond.
Stands completed and ready for painting.
Warping was unavoidable but a welcome effect nonetheless.

Construction continues in earnest...

Sunday, March 6, 2011

Saturday is Game Day

This past Saturday we met up at my house aka the man cave and treehouse where we finally got to play on Dave's (aka Soldat) Capuan Arena. 


We populated it with my Gladiators, Dave's and Willy's. No actual spectator figures at the moment but maybe at a future date.

From left to right: Decimus Maximus the Spaniard (Dave's single combatant from Reaper) looking on as my lads (circular bases) and Willy's yet unnamed scoundrels (square bases) from a rival ludus mix it up. 


The home team is on the far end, the visitors in the foreground and the gallery is populated by another contingent of Willy's gladiators from the Heroscape line.  


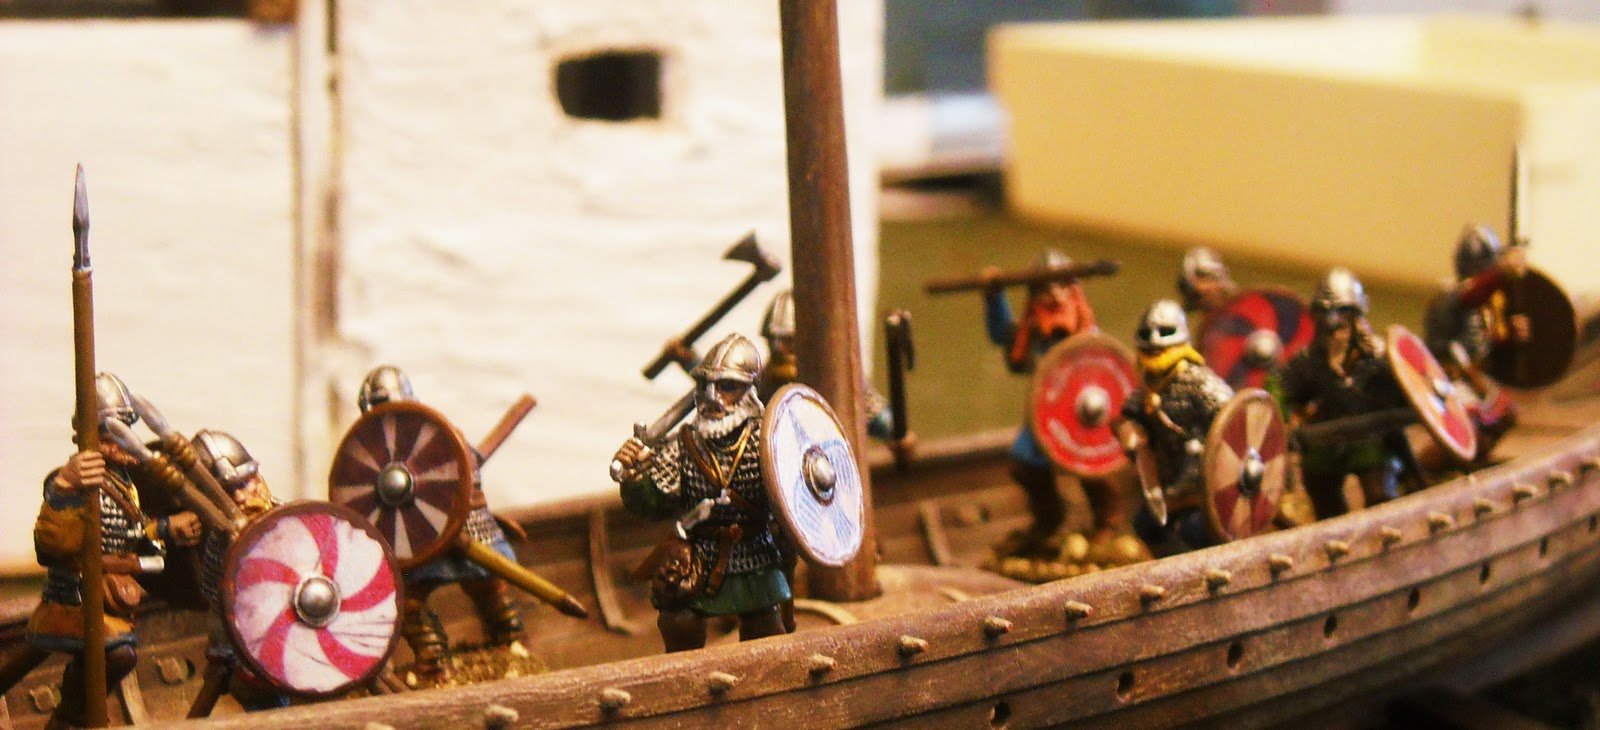
Aside from the Arena fight, Willy brought along his Vikings again and I couldn't resist putting them on my Long Ship for a photo shoot.

On my table for some test shots. Notice Dave's Arena in the background.

Great detail shot of Willy's Vikings.


Big difference with blue backdrop...

and some cropping.

Another close up.

Sailing into fog.

A more appropriate backdrop for these marauding raiders!

Never walk
away from home
ahead of your axe and sword.
You can't feel a battle
in your bones
or foresee a fight.*
* from 'The Havamal' or Book of Viking Wisdom.

LinkWithin

Related Posts Plugin for WordPress, Blogger...