Showing posts with label WaW. Show all posts

Wednesday, November 10, 2010

Micro Armor / Board Game Conversion Terrain Components, whew!

Long title, I know, but I've decided to post this explanatory post regarding terrain components I use for my micro armor / board game conversion to answer multiple questions I've been getting from different forum groups.

Here goes...
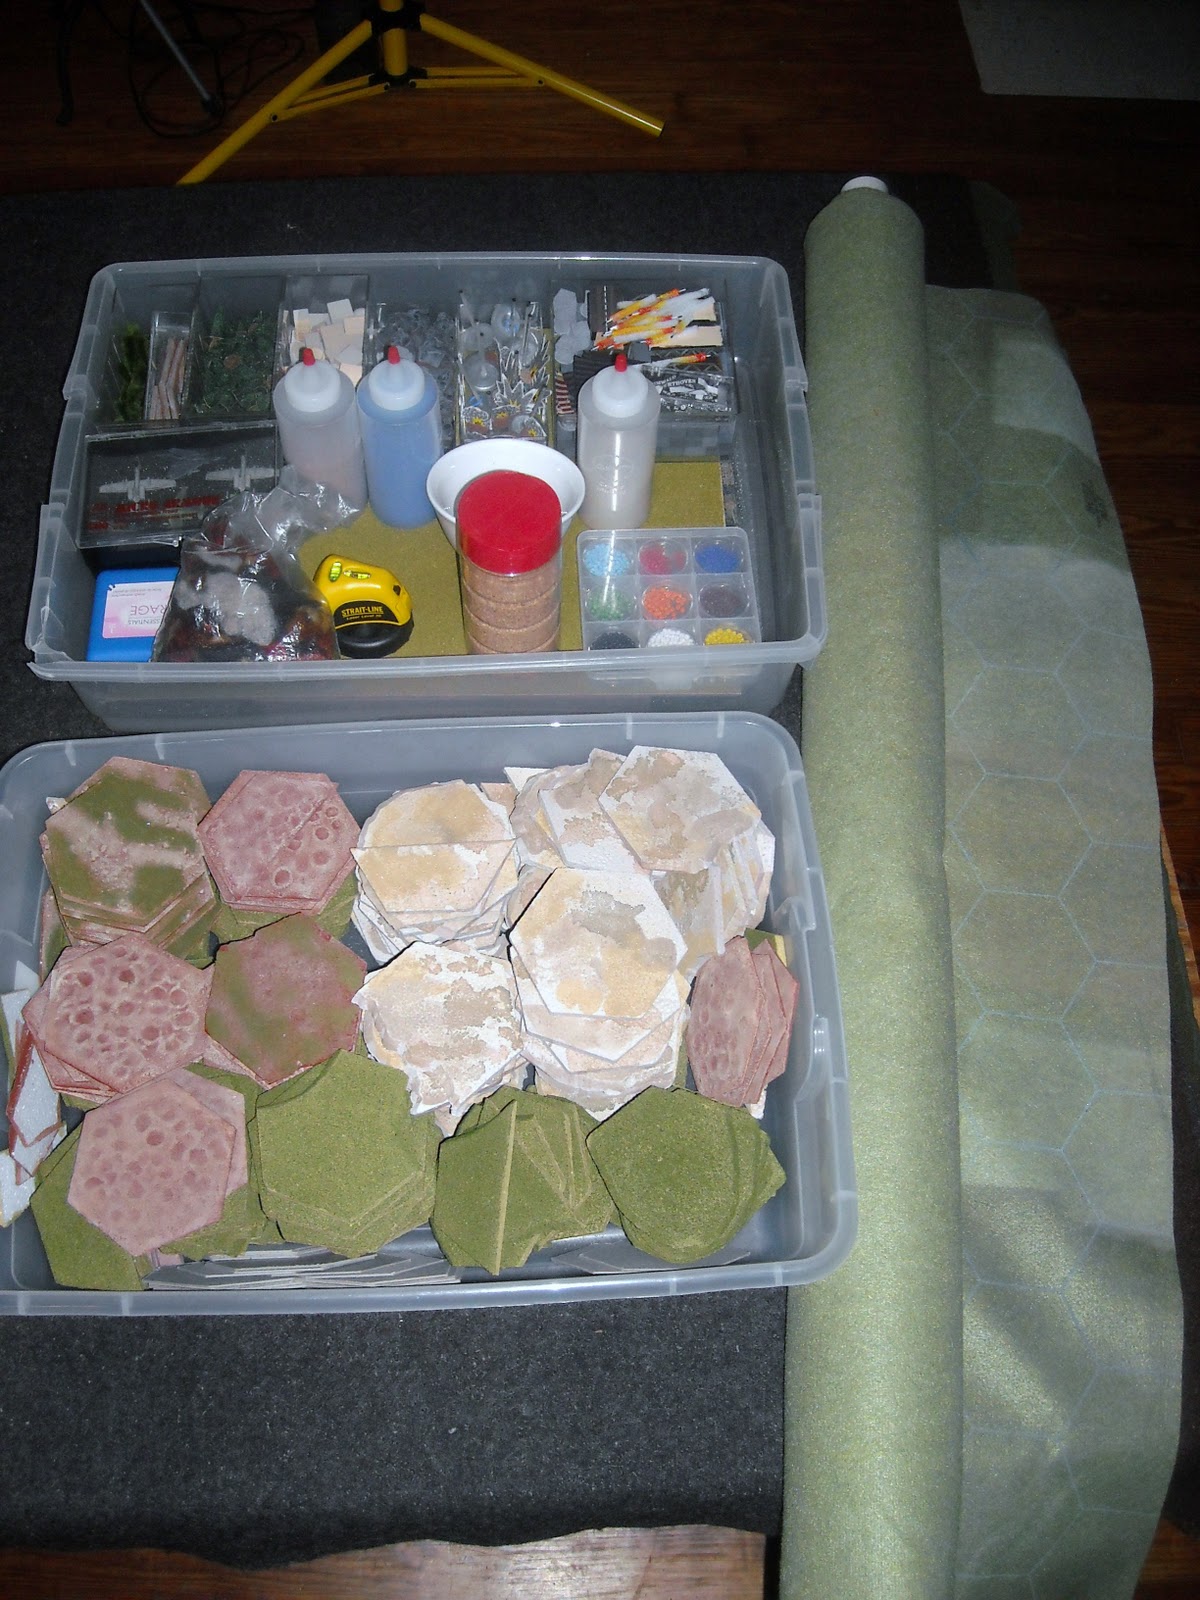
Everything I need (and carry) to fit on a 4'x6' table and run a game. 
Here's an assortment of blocks, trees, colored beads (as gaming aids since I abhor using counters if at all necessary), colored sand, etc. I recommend getting a leveling laser for determining LOS. 
I used GHQ Terrain Maker hexes cut down to 1/8" thick to better simulate rolling hills proportioned for micro. Note the different colored hexes: green for Euro and variegated sand color for Mid East. I had to create additional terrain hexes as well to represent cratered areas in the Blood and Bridges map. These hexes where cut to about 1/16 thickness and I used a slurry mix of white glue, sand and paint to simulate the craters. Base coat and dry brush for visual effect. 
City Components: loose 3/4" and 1/2" blocks, spray painted gray for generic urban / town setting.  Beige / sand colored blocks are used for Mid East scenarios (see below)
Standard gray chip board cut to match hex, this represents hard paved areas such as concrete and asphalt, note the absence of streets, etc. The plainer the better.
Evergreen trees were the easiest form to represent especially for generic European settings (as the current World at War system is based on). Trees on the left were handmade by my buddy Justo (aka Uncle Greasy, another consummate gamer par excellence) and are free standing. Trees on the right were from GHQ Terrain Maker as are the hills (which I've cut to 1/8" thickness).
Scratch built trellis bridges - more cost effective for me especially since I need a few of these buggers (8 minimum) for the Blood and Bridges map. Lotsa river crossings!

My interpretation and answer to modeling Middle East towns. Any guesses on how I constructed the minaret? Hint: they're all initially separate pieces. I've used these in a couple of Arab-Israeli scenarios included in the World at War Compendium along with a desert Hotz Mat (which is too plain vanilla and I'd have to modify color-wise - look for that upcoming post) and Terrain Maker hexes.
Put 'em all together and Voila!

Infantry platoons fighting from town hexes. Roads: sand, Rough hex adjacent to town: lizard litter; Fields: print fabric
Bottom line is that I use my imagination when perusing the aisles of any craft store. I'm always on the lookout for anything that can simulate real life prototypes on my gaming table. There are plenty of generic materials ready made that can be used to enhance our gaming tables for maximum eye candy without spending a fortune.


On to more gaming...

Tuesday, October 26, 2010

World at War: Blood and Bridges, Scenario 5: Hold the Line


In preparation for an upcoming local con here in Houston (MagCon 2: http://mag-con.com/) I've set up my game table for a scenario from the stand alone module Blood and Bridges from World at War. I posted a couple of scenarios from the first game Eisenbach Gap and needless to say, I'm hooked. The cool thing about this the great fun I have converting flat 2D maps to micro terrain on my table. Funny thing about me is (and Willy aka LTLDad can attest to this) that as soon as I complete my project goal I'll set it aside and start another project. Ahh, go figure. Us gamers are an ADD riddled lot. 


At any rate, Blood and Bridges is best described in this Boardgamegeek review: http://boardgamegeek.com/boardgame/35035/world-at-war-blood-and-bridges. Simply put, this a platoon based game with a vehicle representing a platoon of 5-10 vehicles. 


Here's a portion of Blood and Bridges map per the scenario special rules recreated on my game table. I used colored sand to delineate the roads (beige) and rivers/lake (blue). Trestle bridges are scratch built along with the pine trees (by Justo). Since BnB is a continuation of WWIII action started in the Eisenbach Gap, additional terrain features have been added: burned crops, craters, shattered forest and city ruins. 
Map orientation with north being top of the page. This scenario calls for the a defensive action by Brits without the aid of their MBTs. Victory conditions for the Soviets is to take Anhausen (4 town hexes) located on the northwest corner of the map.
In this corner: the Brits. Top right group: Elements of the Royal Lancers with a platoon each of a Scimitar and Striker. HQ is represented with a Scimitar model marked with an "H". Bottom right group: Elements of the 3rd Queen's Regiment featuring a FV432 transport platoon, a Scorpion, an FV438 Swingfire with two Infantry platoons plus a Milan ATGM support weapon. Left group: 2x Lynx helos.
And in this corner: the Soviets fielding the 74th Guards Tank Regiment. Top left group: 7xT80, a single SA13 Gopher (proxied by an SA9 Gaskin), 3x BTR70 and 3x Infantry with support weapons: a Spandrel and SA16.
British FV432 APC 
British Milan ATGM

British FV438 Swingfire ATGM
British Scorpion Light Tank
British FV107 Scimitar Light Tank
British Lynx

Soviet Spandrel ATGM
Soviet SA-16

Soviet SA13 Gopher
Soviet BMP-2 APC
Soviet T80 MBT
Now that the stage is set and the players are in place let the firing commence and the battle begin. Batrep to follow.

Tuesday, May 11, 2010

World at War: Eisenbach Gap, Scenario 3: Rolling Hot

For a quick reference here's a scan (also b/c I'm lazy) of the scenario page from Eisenbach Gap. It's chock of full of information: the flavor story, units, their deployment, SSR (special scenario rules) and victory conditions.


The beauty of this system is evident in its game play and mechanics. Its simplicity allows you to concentrate all your mental energy on your tactical and strategic decisions. Not wasted on micro-management, umpteen million tables and charts or complex games systems.

Each scenario I've tried so far hasn't disappointed me. Whether solo or against an opponent the game's quality and superior design is demonstrated and fun is had by all. Or maybe this is just a testament to the well thought out simplicity. Not to mention that its loads of enjoyment. I usually play on the Soviet side. It's very challenging and I sometimes get bull headed about it in true Soviet fashion. So a word of caution for any player choosing the Soviets: be resigned to losing units. Quit whining about the superiority of NATO. Just deal with it and have a blast (pun intended). I know I do!!


Table map setup looking West.   


At Hugelsdorf the B-grade units of the 33rd Motor Rifle occupied the adjacent hilltop with their HQ supported with 2 platoons of T62s. 

GHQ CATALOG PIC

4 platoons of infantry with only a Sagger ATGM support weapon were dug-in inside the town. Directly east adjacent to the irrigated fields and ensconced safely (or so I thought) in the woods were two 2 platoons of the thin-skinned BMP1 APCs armed with the fearsome Sagger.


All were anticipating the expected US approach from either road on the west edge of the map.

Soviet set up looking west.

Directly northeast of the 33rd's position lies Eisenbach (NATO game objective). This town was occupied by the C-grade units of the 87th Rifle composed of obsolete T55s, 
GHQ CATALOG PIC
2 platoons of BTR60 APCs
GHQ CATALOG PIC

and infantry armed with only one Sagger.


The Soviets' only hope was the timely arrival on Turn 3 of their reinforcements: 5 platoons of A-grade T72s of 1st Tanks expected anywhere along the north edge of the map.


Opening barrages (2 x smoke represented by red blocks) by NATO was on target and effectively blinded the 33rd Mortor Rifles for two turns. Then Delta Company's Abrams immediately occupied the wooded hills and engaged Hugelsdorf. They took out one of the BMP1s in the woods in a lopsided gun fight. BMP1s were just too thin skinned and sensitive for this kind of engagement.  


North of this position protected in a valley were Alpha Troop's Bradleys and M106 (self propelled 81mm mortars mounted on an M113 APC). 
GHQ CATALOG PIC


This was the logical jump-off point to assault Eisenbach. However this needed to be done in stages because that direct and clear approach was covered by the 87th. In a classic textbook bounding overwatch maneuver the Bradleys made it to the woods, scouted out the route ahead to Bergengipfel and called in some mortar strikes to pound Eisenbach. 


The Abrams made it to Bergengipfel and commenced firing on Eisenbach adding their firepower to the Bradleys and the mortars.

The Soviets were holding their own but kept looking northward for their relief. "When is that damned Alexei Stephanovich and his T72s going to get here? They need to take these American from behind." thought the 87th's commander as he worriedly scans the west bound road to Bergengipfel from the cupola of his command T55 tank.

First blood was drawn as the incoming mortar barrage took out a T55 platoon. Thankfully the infantry were dug-in all around and were relatively safe.


The valiant defense of Eisenbach continued: infantry of the 87th launched a Sagger to flush out the Abrams hiding in Bergengipfel. Meanwhile, another T55 platoon positioned just outside the town in the irrigated fields suffered multiple hits causing disruption and reduction.
 

The action was getting thick and this was just Turn two! Suddenly before Turn 3 could start with the possibility for the reinforcements to arrive (activate) we heard something awful - what every gamer is loathe to hear. "Sorry, guys," says the store manager with an apologetic smile, "but you'll have to start picking up your stuff because I'll be closing the store in about 20 minutes." 

AAAARRRRGHH! Frustration!! 

Alas, the game couldn't be finished due to the store closing so this'll have to be a re-fight sometime in the near future.

Stay tuned...


Monday, May 10, 2010

Air Assets in Micro

I'm done with all the microarmor and am now finishing up the rest of the air assets needed to play the scenarios featured in the World @ War series of games that I own. In the past posts I've featured the Hind, Cobra and Tornado. What's on deck are the:


West German BO105 

AH64 Apache

A10 Warthog

IDF F4E

Ready for priming and painting.

What's coming next? UK Royal Air Force's Lynx, Soviet SU25 Frogfoot and the West German Tornado.  

Friday, March 26, 2010

World @ War: Eisenbach Gap, Scenario 4: Maelstrom CONCLUDED


Turn 5 and 6 resulted in maneuvering: Soviets trying desperately to make their way north unmolested while the US are taking their toll on the lagging 1st Tanks and 33rd Motor Rifle.  1st Tanks is literally dead in their tracks.  The only effectives left are their recon contingent of 2 BRDMs, one armed w/a Sagger ATGM (right).  
Fire is exchanged between a Delta Abrams but Ivan keeps missing.  The Abrams fires back scoring hits but are ineffective b/c these units were concealed and under cover on a wooded hill.


The action resumes as Alpha’s Bradley calls indirect fire for the M106 (right) dropping HE on the 33rd's two thin skinned BMPs destroying them as they try to pass the Eisenbach gauntlet.


The rest of their company: 2 remaining T62 platoons and HQ (light blue bead) advance cautiously using all available cover, including the burning wreck of an Alpha Abrams.  They're safe for now.


Waiting for them patiently in Eisenbach is a mix bag of a Delta Abrams platoon supporting Alpha’s HQ and Bradley platoon.


Meanwhile on the west side elements of the 87th (2x BTR60s lodaded w/ 2x Infantry Platoons) take advantage and make a dash for freedom thru the thinly held line by Charlie Company.  Score 4 points towards the Victory Conditions for the Soviets.


However the rest of the 87th aren’t out of the woods yet.


In fact one of their valiant T55s got caught out in the open to be the sacrificial lamb covering his comrades’ advance.  He will be awarded posthumously.


Turn 9 finds the remnants of 1st Tank (2x T72 and HQ) able to rally and move towards the position recently vacated by the recon element who's moved into Bergengipfel.  However, it’s too close for comfort and the deadly sharpshooter Abrams from Delta takes them both out.
The Delta Abrams covering the right flank closes in to cut off the 87th‘s escape but misses terribly.  There’s hope for the Soviets yet even with their staggering losses.
East side action finds Alpha Bradley moving from Eisenbach to a better spotting position in the woods to call down heavy mortar fire from the M106 to the hunkered down T62s of the 33rd. Damn! They missed as well. 
However, the T62s didn’t and exacted their revenge with overwhelming fire power which completely obliterates the foolhardy Bradley (burning on the horizon in the woods)!  Now the M106 (right) is temporarily neutralized, that is until the HQ can move and get a better bead on the bad guys.  I doubt if he’ll leave the safety of Eisenbach though.
The 87th finally activates and races towards the finish line only to stop right at the edge.  Charlie’s 1st Infantry Platoon positioned in the woods (top right) was waiting for this exact moment and fires the Dragon aaaannnnd misses.  This depletes their ammo which means that two turns must pass before they can fire again. 
Charlie activates for the last time this turn and orders its 2nd Infantry Platoon on a desperate gamble: assault the enemy and stop them at all cost.  They're effort is all in vain.  They disorder the T55s at the cost to themselves. Turn 10, the Chit Draw gods smile upon the Soviets as the 87th activates first and promptly exit off the board for a costly Soviet win.

LinkWithin

Related Posts Plugin for WordPress, Blogger...