Wednesday, March 31, 2010

Teaser and a break from Modern: Mid Republican Romans for FoG

Awhile ago (make that 2 years ago and some change) I got into Ancients again.  At that time FoG was a highly anticipated rules set to be published by Osprey and replete w/a plethora of recycled images from Osprey's extensive library.  

Since I use to play Tactica back in the day as my intro to Ancients and Medieval periods I thought I'd give it another try.

Here's a few shots of my Mid Republican Roman's (Scipio Africanus' army).

My Triarii (blue shields) w/ Numidian elephants and the Hastatii (green shields) in the foreground.

(click on the pix to enlarge)
Foreground: Hastati, background: Triarii

Hastati

Spanish Scutarii (allies) from Corvus Belli

Italian Allies Pedites Extraordinarii (white shields)
next to my Spanish with the Cretan archers in white tunics screening the front

The important but brittle Velites with the ubiquitous wolf's head


More to follow...


Friday, March 26, 2010

World @ War: Eisenbach Gap, Scenario 4: Maelstrom CONCLUDED


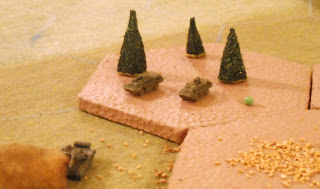
Turn 5 and 6 resulted in maneuvering: Soviets trying desperately to make their way north unmolested while the US are taking their toll on the lagging 1st Tanks and 33rd Motor Rifle.  1st Tanks is literally dead in their tracks.  The only effectives left are their recon contingent of 2 BRDMs, one armed w/a Sagger ATGM (right).  
Fire is exchanged between a Delta Abrams but Ivan keeps missing.  The Abrams fires back scoring hits but are ineffective b/c these units were concealed and under cover on a wooded hill.


The action resumes as Alpha’s Bradley calls indirect fire for the M106 (right) dropping HE on the 33rd's two thin skinned BMPs destroying them as they try to pass the Eisenbach gauntlet.


The rest of their company: 2 remaining T62 platoons and HQ (light blue bead) advance cautiously using all available cover, including the burning wreck of an Alpha Abrams.  They're safe for now.


Waiting for them patiently in Eisenbach is a mix bag of a Delta Abrams platoon supporting Alpha’s HQ and Bradley platoon.


Meanwhile on the west side elements of the 87th (2x BTR60s lodaded w/ 2x Infantry Platoons) take advantage and make a dash for freedom thru the thinly held line by Charlie Company.  Score 4 points towards the Victory Conditions for the Soviets.


However the rest of the 87th aren’t out of the woods yet.


In fact one of their valiant T55s got caught out in the open to be the sacrificial lamb covering his comrades’ advance.  He will be awarded posthumously.


Turn 9 finds the remnants of 1st Tank (2x T72 and HQ) able to rally and move towards the position recently vacated by the recon element who's moved into Bergengipfel.  However, it’s too close for comfort and the deadly sharpshooter Abrams from Delta takes them both out.
The Delta Abrams covering the right flank closes in to cut off the 87th‘s escape but misses terribly.  There’s hope for the Soviets yet even with their staggering losses.
East side action finds Alpha Bradley moving from Eisenbach to a better spotting position in the woods to call down heavy mortar fire from the M106 to the hunkered down T62s of the 33rd. Damn! They missed as well. 
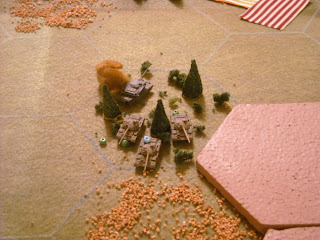
However, the T62s didn’t and exacted their revenge with overwhelming fire power which completely obliterates the foolhardy Bradley (burning on the horizon in the woods)!  Now the M106 (right) is temporarily neutralized, that is until the HQ can move and get a better bead on the bad guys.  I doubt if he’ll leave the safety of Eisenbach though.
The 87th finally activates and races towards the finish line only to stop right at the edge.  Charlie’s 1st Infantry Platoon positioned in the woods (top right) was waiting for this exact moment and fires the Dragon aaaannnnd misses.  This depletes their ammo which means that two turns must pass before they can fire again. 
Charlie activates for the last time this turn and orders its 2nd Infantry Platoon on a desperate gamble: assault the enemy and stop them at all cost.  They're effort is all in vain.  They disorder the T55s at the cost to themselves. Turn 10, the Chit Draw gods smile upon the Soviets as the 87th activates first and promptly exit off the board for a costly Soviet win.

Thursday, March 25, 2010

Fallschirmjagers


Nuts! is a skirmish WW2 game that I purchased two years ago and have been dying to play.  Recently my buddy Willy aka Veloci aka Sturmflieger hosted a few games and is very consistent with his batreps on his blog: 


We started playing using his stuff versus some of my spare and re-based 15mm Soviet Shtrafnoy and Strelkovy from Battlefront just to get my feet wet.  My real goal is to skirmish at larger scales.  Anyway, I have some 28mm Fallschirmjagers from Black Tree Design that I purchased in SoCal on my last visit.  I finally busted them out and started painting.

Above: A couple of completed examples after Step 3 Base Coat (Step 1  hand painted Black Primer; Step 2 Drybrush w/ sand color).


Below: Examples of Step 5 Camo application – these look really flat and my first inclination is to drybrush them after a couple of black ink washes.  But I held back in lieu of a new technique that I'm trying out.


Below: the figs after being dipped in The Quick Shader from Army Painter (this solution is essentially a thick an ink wash – just dip, remove excess by flicking and wait 24 hours to cure and it'll be ready for some final drybrushing).  They look thick, wet and glossy although this pic was taken about 6-7 hours after dipping.  I’m hoping for it to tone down a bit after a few more hours.

Dry-brushed, dull coated, completed and ready for action!  

A lone Panzerschreck taking a bead on a T34/85.  "Where's my loader?  Look, Ma, no Hans!"

Watch out!  Patrol's about to be waylaid by a T70.

Mission: take out Stalin's Organs aka Katyusha batteries wrecking havoc with our forces. 

The Russians are coming...

World @ War: Eisenbach Gap, Scenario 4: Maelstrom


Belligerents:
·         Soviets (enter anywhere on south edge of map)
o   1st Tanks: 10x T72 Platoons with attached BRDM ATG and Recon
o   33rd Rifles: 3x T62 Platoons, 2x BMP
o   87th Motor Rifle: T55s, 2 infantry Platoons with 2x BTR60s
o   69th Attack Helicopter Regiment: 2x Hinds
·         US (set up first on northern half of map)
o   Alpha Troop: 1x Abrams Platoon, 2x Bradley Platoons, 1x M106 (self propelled mortars) and attached Chaparral (SAM battery)
o   Charlie Company: 2x Infantry Platoons w/ 1x Dragon ATGM and 1x M113 APC Platoon
o   Reinforcements (arrive on Turn 2): Delta Company: 3x Abrams Platoons

Objective: Exit 6 Soviet units off the north (top) map edge.  


Initially the Soviets followed their no nonsense, basic attack doctrine and go up the middle with their spear-point: 1st Tanks echeloned on their right flank by the 33rd Motor Rifle (B grade units).  However, that flank is bolstered by hovering Hinds entering the southeast between Rumwald and Lansamen on Turn 2.


Action continues on Turn 3 as the US reinforcements arrive and promptly blunts 1st Tanks' line of advance evidenced by the burning hulks.


On the western flank the 87th Motor Rifle is attempting to turn the US right flank held by the vaunted Charlie Co. (Infantry is represented by green colored blocks shown in the woods.)  Charlie’s seen withdrawing on the road to more advantageous ground closer to Schlafendbauer and the northern map edge: 1st infantry platoon is loaded up on transports while 2nd platoon is hoofing it thru the woods as a rear guard.


On Turn 4 the Hinds launch against some choice targets: an Abrams caught in the open 


and a Bradley and another Abrams hunkered down in Eisenbach.  This is in revenge for their burning T72 comrades.  But all this is to no avail since they both missed!  Another lucky break for the US.


Since goose eggs were the prizes for their efforts, Hinds aren’t known to hang about and get 'stingered' up their collective backsides.  Fricken’ Ivan couldn’t hit the broad side of an Abrams so it’s Stoli time, "Exit stage right…" Dasbedanya!


To be continued...


Wednesday, March 24, 2010

Let's just dive right into it: my latest project.

Here's the latest project I've been working on.  I thought about this a couple of years ago when I was first introduced to this great board game called World at War: Eisenbach Gap by Lock N Load.  Incidentally it's had a couple of expansions (which I now have all of them: Death of 1st Panzer and Blood and Bridges) and they just keep getting better and better.
Since I started out in gaming back in the 70s using miniatures, board games were always a fascination and source of intimidation for me.  My imagination ran rampant with the possibilities of all the different eras and units to game with.  Alas, since I had no gaming buddy to play and learn with back in those formative years I stuck to miniatures.  
Now I can happily say that I'm transitioning and finding a way to combine both gaming genres.
Don't get me wrong, miniatures are still my first love but I'm finding that the world of boardgames is worth exploring. 


Here's the game map.


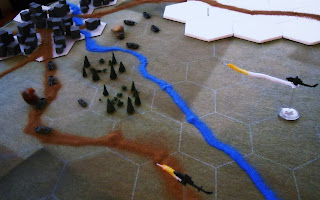
And here's my table top miniatures interpretation.


It's almost complete.  The white hexes are 1/4" thick Terrain Maker hexes from GHQ and are just place holders in the meanwhile so I can practice a few games.  I ordered a 4x6 map wtih a 4" hex grid from HotzMats on a 'European Field' pattern and works great for my micro conversion.  I'm having a set of flocked and contoured hexes for my hills coming soon.


Just for fun I posed a few figures on the table and took these shots.  Those are two Cobras savaging some T72s.


Just another angle.


To be continued...

LinkWithin

Related Posts Plugin for WordPress, Blogger...