Tuesday, October 26, 2010

World at War: Blood and Bridges, Scenario 5: Hold the Line


In preparation for an upcoming local con here in Houston (MagCon 2: http://mag-con.com/) I've set up my game table for a scenario from the stand alone module Blood and Bridges from World at War. I posted a couple of scenarios from the first game Eisenbach Gap and needless to say, I'm hooked. The cool thing about this the great fun I have converting flat 2D maps to micro terrain on my table. Funny thing about me is (and Willy aka LTLDad can attest to this) that as soon as I complete my project goal I'll set it aside and start another project. Ahh, go figure. Us gamers are an ADD riddled lot. 


At any rate, Blood and Bridges is best described in this Boardgamegeek review: http://boardgamegeek.com/boardgame/35035/world-at-war-blood-and-bridges. Simply put, this a platoon based game with a vehicle representing a platoon of 5-10 vehicles. 


Here's a portion of Blood and Bridges map per the scenario special rules recreated on my game table. I used colored sand to delineate the roads (beige) and rivers/lake (blue). Trestle bridges are scratch built along with the pine trees (by Justo). Since BnB is a continuation of WWIII action started in the Eisenbach Gap, additional terrain features have been added: burned crops, craters, shattered forest and city ruins. 
Map orientation with north being top of the page. This scenario calls for the a defensive action by Brits without the aid of their MBTs. Victory conditions for the Soviets is to take Anhausen (4 town hexes) located on the northwest corner of the map.
In this corner: the Brits. Top right group: Elements of the Royal Lancers with a platoon each of a Scimitar and Striker. HQ is represented with a Scimitar model marked with an "H". Bottom right group: Elements of the 3rd Queen's Regiment featuring a FV432 transport platoon, a Scorpion, an FV438 Swingfire with two Infantry platoons plus a Milan ATGM support weapon. Left group: 2x Lynx helos.
And in this corner: the Soviets fielding the 74th Guards Tank Regiment. Top left group: 7xT80, a single SA13 Gopher (proxied by an SA9 Gaskin), 3x BTR70 and 3x Infantry with support weapons: a Spandrel and SA16.
British FV432 APC 
British Milan ATGM

British FV438 Swingfire ATGM
British Scorpion Light Tank
British FV107 Scimitar Light Tank
British Lynx

Soviet Spandrel ATGM
Soviet SA-16

Soviet SA13 Gopher
Soviet BMP-2 APC
Soviet T80 MBT
Now that the stage is set and the players are in place let the firing commence and the battle begin. Batrep to follow.

Friday, October 22, 2010

More Ruination

The thing about skirmish games I've found is that you never have enough cover for your troops when attacking. So to supplement my urban ruins for the Stalingrad, etc. the need for additional rubble piles are constant. Here I am again making a few more.  I've learned a few things from my earlier forays to short cut and get better results.  
(click on the pix to enlarge)
Raw materials: standard blue (or pink) insulating foam and packing foam from appliance boxes 
Rubble mix: cat litter and lizard litter. Incidentally, cat litter is a friable material and can be bashed with a hammer for the random sized look. Simply place a scoop (3-4 Tablespoons) in a zip lock bag, bleed out the air and start bashing. Result: powder, granules and aggregate in differing sizes. 
Completed wall sections using scrap foam pieces on foam base with white glue.
The all important prep step using sprayed on water.
Flocked w/ rubble mix, water downed white glue and repeated spraying in between applications 


Coming up: color application, painting and drybrushing.

Monday, October 18, 2010

Bugs! Part 2

After a short hiatus, I finally decided to continue the long arduous process of painting up my Bugs.  After assembly (which was another daunting undertaking in of itself) I left these bad boys alone for quite some time as I followed other pursuits and interests. If you're a gamer I'm sure you can relate.


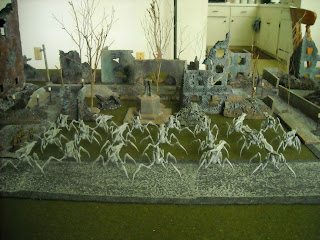
20 complete Bugs! with my urban ruins as a backdrop.

Detail shot of the myriad poses.


Baby steps being the key, I spray black primer as usual. Then comes the drybrushing.  In this case I'm using a dove grey. 


Side by side comparison of black primered and drybrushed steps.

I do believe that this is one of the labor intensive steps because of all the detail these models have.


 1 down 19 to go. Then color's next. Stay tuned, loyal followers...

Saturday, October 2, 2010

Red Blok Unit from AT-43

I've always been intrigued with the human factions of AT-43. Namely the Red Blok and U.N.A. forces. Not so much the alien races. And what really caught my fancy were the mechs that the Red Blok units fielded. I think that my endless fascination with things Russian continues as my collection grows. Needless to say I finally got a hold of some and was pleasantly surprised. For prepainted miniatures Rackham has done an awesome job with applying enough weathering on their paint schemes to make their minis more battle ready as opposed to coming out fresh from the factory or parade ground. They're done with consistency as compared to the Star Wars and Hero Clix brands.

Here's a few shots of Red Blok unit out in the field as they deploy for a mission. Excuse the quality of some of the shots since the photographer had to get out of the way of the chaos of units getting ready for battle.

Spetnaz in the foreground with a Kossak mech in the background.

More Spetnaz interspersed with Kolossus min-mechs.
  
Nice detail shot of Kossak with medium missile launcher.

More Krashny Soldati with a Strielitz Kolossus with Col. Odin O-1 looking on.


Since I don't particularly like learning this rules set I'll be using these bad boys against my newly acquired Arachnids aka Bugs (from Starship Troopers) whenever I finish painting them and all other comers from various sci-fi game universes using the Chain Reaction system from THW.

LinkWithin

Related Posts Plugin for WordPress, Blogger...